Do It Yourself Fencing in NH
Purchase all your material from Fences Unlimited, pick it up or have it delivered, then use the information below as a guide to installing or repairing your own fence.
Chain Link Fence Installation Guide Download – Click Here…. Tools available for rental.

Terminal Post & Parts

Line Post & Parts
Step 1 – Survey Property Lines
Be sure that the fence does not exceed property lines. Most fence installers recommend that all posts be set approximately 4″ inside the property line. This will help avoid encroaching on adjoining property with concrete footings. This is easily done by stretching a string along the property line and setting the posts 4″ inside.
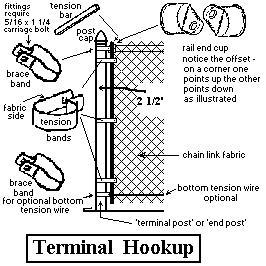
Step 2 – Locate and set Terminal Posts (corner, end, and gate posts are called terminal posts)
Distance between gate posts is determined by adding the actual width of the gate plus an allowance for hinges and latches. Usually walk gates require 3 3/4″ for hinges and latches and double drive gates require 5 1/2″. Next, dig the holes, but first, CALL DIG SAFE.
 Terminal posts should be set 2″ higher than the height of the fence fabric and line posts 2″ lower than the height of the fence fabric (terminal posts should be 4″ higher than the line posts). Set the terminal posts in concrete using a concrete mix. You can use 1 part cement, 2 parts sand, and 4 parts gravel. There is also premixed cement. Use a level to make sure the posts are straight. Posts should be centered in the hole. Crown posts footings so the water will drain away from the posts.
Step 3 – Locate and set Line Posts
After the concrete around the terminal posts have hardened, stretch a string tight between the terminal posts. The string should be 4″ below the top of the terminal posts. Line posts should not be spaced more than 10 feet apart. For example, if the length between two terminal posts is 30 feet, then line posts would be spaced 10 feet apart (click here to see line post spacing chart). Dig the post holes and set the line posts. Before concrete begins to set, adjust post height by moving post up or down. Top of the line posts should be even with the string. Check with level to make sure posts are straight.
Step 4 – Apply Fittings to Terminal Posts
Check material list and fittings chart above. After all posts have been installed and the concrete footings have hardened, slip the tension and brace bands onto the terminal posts. The long flat surface of the tension band should face towards the outside of the fence. Take care not to spread or distort the fittings. Now apply terminal post caps.
 Step 5 – Apply Top Rail
Attach loop caps to line posts. Insert one length of top rail pipe through the eye-top closest to one of the terminal post. Slide a rail end onto the end of the top rail and attach it to a terminal post by using the brace band (If using swedge top rail, do not insert the swedged end into the rail end). Secure the rail end to the brace band with a carriage bolt. Continue by attaching top rails together. If swedged top rail is not used, you’ll connect the rail ends together by using top rail sleeve. Upon reaching the other terminal post, measure carefully and cut the top rail to fit tightly into the rail end. Secure rail end to the terminal post with brace band and carriage bolt.
Step 6 – Hang Chain Link Fabric
Unroll the chain link fabric on the ground along the fence line. Slide tension bar through the last link on the chain link fabric. Stand the fabric up and lay it against the posts. Fasten the tension bar (that you just inserted) to the terminal post with tension bands (already on the post). Use the carriage bolts with the head to the outside of the fence. Walk along the fence and take the slack out. Loosely attach fabric to top rail with a few wire ties.
To connect two sections or rolls of fence fabric together – take a single strand of wire from one of the sections of fence (Sometimes it is necessary to remove a second wire on the one end in order for the two sections to mesh properly.). Place the two section of fence next to each other (end on end). Join the two sections by winding (corkscrew fashion) the loose strand down through the fence. Join and tighten the knuckles at bottom and top. Now you shouldn’t even be able to see where the two sections were connection together.
To remove excess chain link fence fabric – untie both top and bottom ends of fence. Twist the wire in a corkscrew fashion until the fence comes apart.
Step 7 – Stretch Chain Link Fabric
Fabric should already be fastened to the opposite end of the fence. Insert a tension bar (may need an extra one) approximately 3 feet inside the unattached end of the fabric. Securely fasten one end of the fence stretcher to the tension bar and the other end to the terminal post. Stretch the fabric – the correct tension should allow a slight amount of give when squeezed by hand. The top of the fabric should be located approximately 1/2″ above top rail. Adjust fabric to exact length by adding or removing wire as mentioned in step 6. Insert a tension bar at the end of the fabric and connect tension bands on terminal post. Remove fence stretcher. Attach wire ties to top rail 24″ apart. Attach wire ties to posts 12″ apart. Tighten nuts on all brace and tension bands.
Step 8 – Hanging Gates
After the fence has been completed, install the male hinges to one of the gate posts, hanging the top hinge with pin pointing down and the bottom hinge with the pin pointing up. This will prevent the gate from being lifted off. Set gate in place, aligning top of the gate with the top of fence. Adjust and tighten hinges to allow for full swing. Install gate latch for single gates. Double gates use the same procedure but install center latching device (fork latch).